Git 安裝與初始設定
📝 TL;DR:安裝 Git 設定使用者(
git config --global user.name/email) 產生 SSH 金鑰(ssh-keygen) 加到 GitHub 測試連線(ssh -T git@github.com)。Windows 使用者要注意:先檢查認證管理員、移除舊帳號,避免「登入到別人的 GitHub」的尷尬情況!就像遊戲「新手入門教學」,完成這關才能開始冒險!
前置知識
- 知道如何開啟終端機/命令提示字元
- 有 GitHub 帳號(註冊連結)
步驟一:安裝 Git
Windows
- 前往 Git 官網
- 下載 Windows 版本(會自動偵測系統)
- 執行安裝檔,建議使用預設設定
- 安裝完成後重啟終端機
小技巧:安裝過程中有一堆選項,新手直接「一路 Next 到底」就對了!
macOS
方法一:Homebrew(推薦)
brew install git方法二:Xcode Command Line Tools
xcode-select --installLinux(Debian/Ubuntu)
sudo apt update
sudo apt install git
驗證安裝
# 檢查 Git 版本
git --version
# 輸出:git version 2.43.0
如果顯示版本號,表示安裝成功!
步驟二:檢查舊有帳號(Windows)
Windows 使用者注意:如果電腦曾經登入過其他 GitHub 帳號,需先移除舊認證。
檢查方法
開啟認證管理員
- 按
Win + R輸入control確定 - 進入「使用者帳戶」「認證管理員」
- 或直接搜尋「認證管理員」
- 按
找到 GitHub 認證
- 點擊「Windows 認證」
- 找到
git:https://github.com - 確認是否為你的帳號
移除舊認證
- 如果不是你的帳號,點擊「移除」
- 詳見:移除 Git 認證教學
真實案例:很多人在公司電腦用個人帳號,回家用公司帳號,結果推送到錯誤的 GitHub!定期檢查認證管理員可以避免這種尷尬。
步驟三:設定使用者資訊
# 設定全域使用者名稱(顯示在 commit 中)
git config --global user.name "你的名字"

# 設定全域 email(需與 GitHub 一致)
git config --global user.email "your-email@example.com"
範例:
git config --global user.name "Lucas Hsu"
git config --global user.email "lucas@example.com"
驗證設定
# 查看所有全域設定
git config --global --list

# 或查看特定設定
git config --global user.name
git config --global user.email重要:這個名字和 email 會出現在每個 commit 上,所以別亂填(例如「測試帳號」或「路過的」)!
步驟四:產生 SSH 金鑰
SSH 金鑰用於安全地連接 GitHub,避免每次都輸入密碼。
1. 檢查現有金鑰
# Windows
dir %USERPROFILE%\.ssh

# Mac/Linux
ls -la ~/.ssh
如果看到 id_ed25519 或 id_rsa,表示已有金鑰,可跳至步驟 3。
2. 產生新金鑰
# 使用 Ed25519 演算法(推薦)
ssh-keygen -t ed25519 -C "your-email@example.com"

# 如果系統不支援,使用 RSA
ssh-keygen -t rsa -b 4096 -C "your-email@example.com"
互動過程:
Enter file in which to save the key (...):
# 按 Enter(使用預設路徑)

Enter passphrase (empty for no passphrase):
# 按 Enter(不設密碼,方便但較不安全)

Enter same passphrase again:
# 按 Enter小技巧:新手建議不設密碼(連按 3 次 Enter),方便使用。如果是公司電腦或重要專案,建議設密碼保護!
完成訊息:
Your identification has been saved in ...
Your public key has been saved in ...
The key fingerprint is:
SHA256:xxx... your-email@example.com
3. 複製公鑰
# Windows(複製到剪貼簿)
type %USERPROFILE%\.ssh\id_ed25519.pub | clip

# Mac(複製到剪貼簿)
pbcopy < ~/.ssh/id_ed25519.pub

# Linux(顯示在終端,手動複製)
cat ~/.ssh/id_ed25519.pub
4. 加到 GitHub
- 登入 GitHub
- 點擊右上角頭像 Settings
- 左側選單 SSH and GPG keys
- 點擊 New SSH key
- 填寫:
- Title:例如
My Laptop(識別用) - Key:貼上剛才複製的公鑰
- Title:例如
- 點擊 Add SSH key
Title 命名技巧:用「電腦名稱 + 日期」,例如「工作筆電 2023」,未來要移除舊電腦的金鑰時才知道哪個是哪個!
5. 測試連線
ssh -T git@github.com首次連線會看到:
The authenticity of host 'github.com (...)' can't be established.
ED25519 key fingerprint is SHA256:...
Are you sure you want to continue connecting (yes/no/[fingerprint])?
輸入 yes 後按 Enter。
成功訊息:
Hi your-username! You've successfully authenticated, but GitHub does not provide shell access.恭喜! 看到這段訊息代表你已經成功連接 GitHub,可以開始用 SSH 推送程式碼了!
常見錯誤:
Permission denied:可能是公鑰沒加到 GitHub 或複製錯誤Could not resolve hostname:網路問題或防火牆阻擋
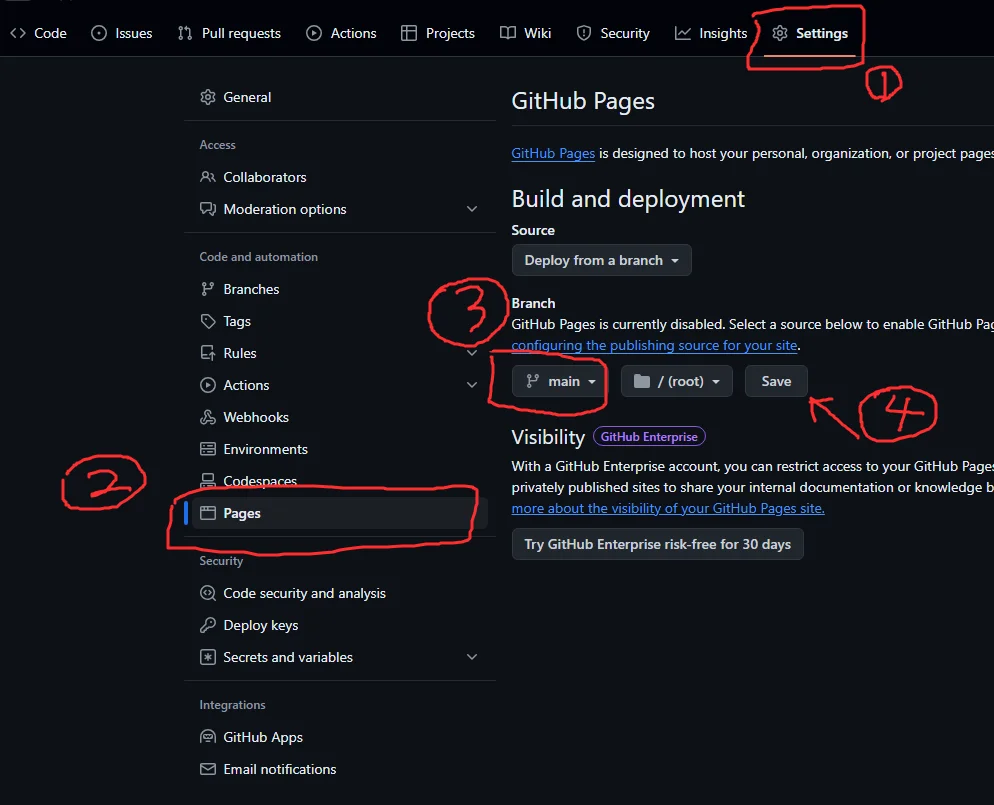
步驟五:建立第一個儲存庫
1. 在 GitHub 建立儲存庫
登入 GitHub
點擊右上角 + New repository
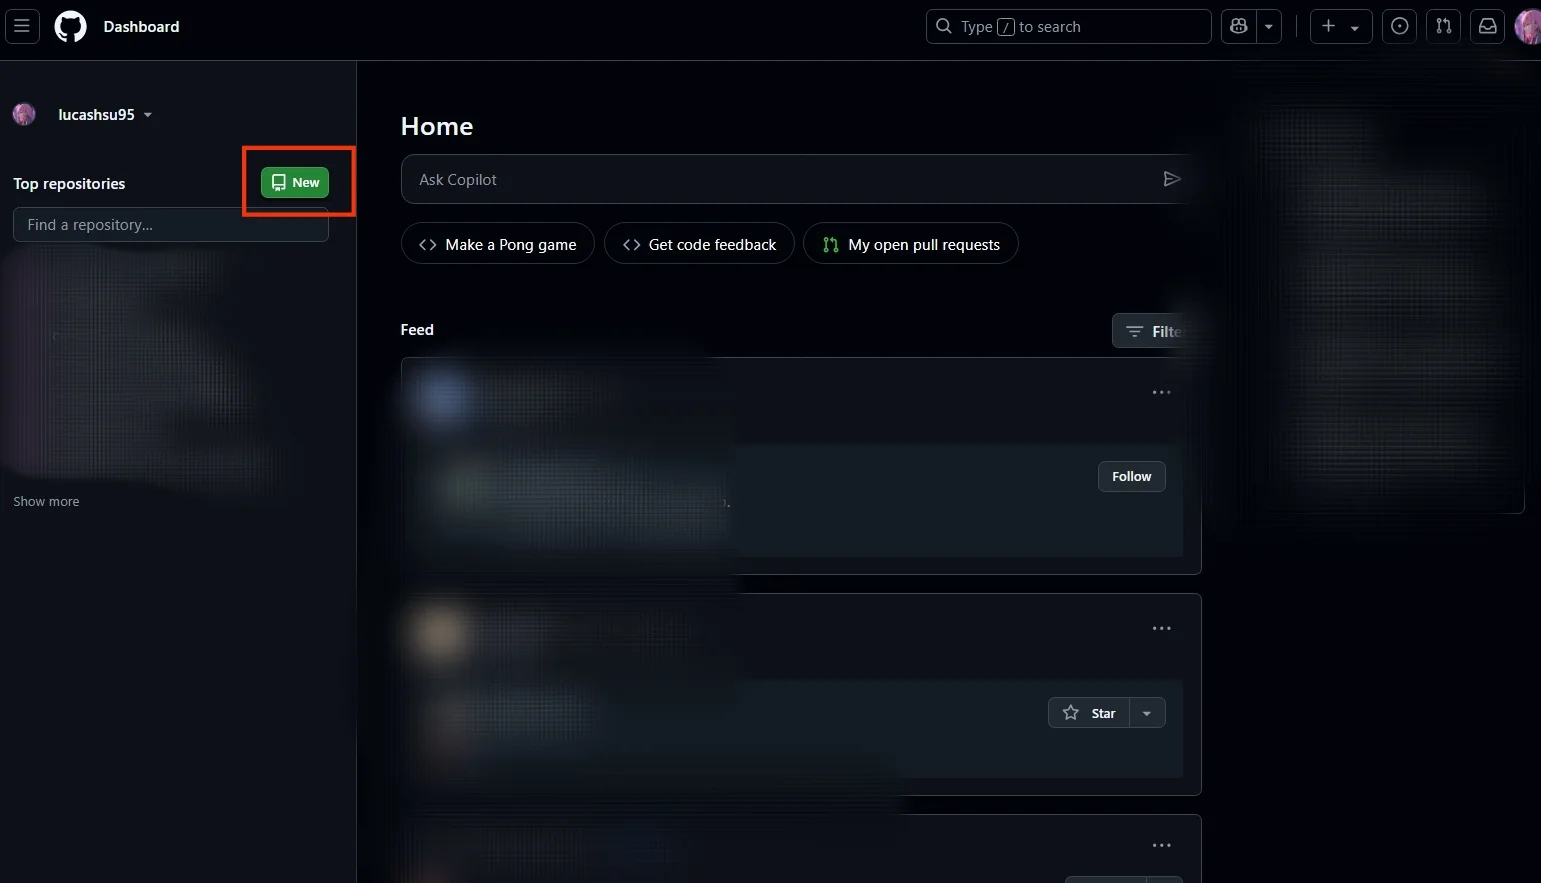
或是找到

填寫:
- Repository name:
my-first-repo - Description:(選填)
- Public 或 Private
- 不勾選 Initialize this repository with a README
- Repository name:
點擊 Create repository
小技巧:第一個專案建議選 Public,讓自己的作品被看見!
2. 本地建立並推送
# 1. 建立專案資料夾
mkdir my-first-repo
cd my-first-repo

# 2. 初始化 Git 儲存庫
git init

# 3. 建立 README 檔案
echo "# My First Repository" > README.md

# 4. 加入暫存區
git add README.md

# 5. 提交
git commit -m "feat: 初始提交"

# 6. 設定預設分支為 main
git branch -M main

# 7. 連接遠端儲存庫
git remote add origin git@github.com:你的帳號/my-first-repo.git

# 8. 推送到 GitHub
git push -u origin main
3. 驗證
- 重新整理 GitHub 頁面
- 應該看到
README.md檔案 - 顯示「feat: 初始提交」commit 訊息
恭喜! 你已經完成「新手村任務」,正式成為 Git 使用者!
實戰練習
練習 1(簡單)
建立一個測試儲存庫,加入 3 個檔案並推送到 GitHub。
參考答案
# 1. 在 GitHub 建立儲存庫 "test-repo"

# 2. 本地建立專案
mkdir test-repo
cd test-repo
git init

# 3. 建立 3 個檔案
echo "# Test Repository" > README.md
echo "console.log('Hello World');" > app.js
echo "body { margin: 0; }" > style.css

# 4. 暫存與提交
git add .
git commit -m "feat: 初始專案結構"

# 5. 連接遠端並推送
git branch -M main
git remote add origin git@github.com:你的帳號/test-repo.git
git push -u origin main

# 6. 驗證:進入 GitHub 應看到 3 個檔案
練習 2(中等)
寫一個 Shell 腳本,自動化「建立專案 初始化 Git 建立 README 推送到 GitHub」流程。
參考答案與思路
#!/bin/bash

# 檢查參數
if [[ $# -lt 2 ]]; then
    echo "用法:$0 <專案名稱> <GitHub帳號>"
    exit 1
fi

project_name=$1
github_user=$2

echo " 建立專案:$project_name"

# 1. 建立專案資料夾
mkdir "$project_name"
cd "$project_name"

# 2. 初始化 Git
git init
echo " Git 已初始化"

# 3. 建立 README
cat > README.md << EOF
# $project_name

> Created on $(date +"%Y-%m-%d")

## 說明
這是一個測試專案

## 安裝
\`\`\`bash
git clone git@github.com:$github_user/$project_name.git
\`\`\`

## 授權
MIT
EOF

echo " README.md 已建立"

# 4. 建立 .gitignore
cat > .gitignore << EOF
node_modules/
.DS_Store
*.log
.env
EOF

echo " .gitignore 已建立"

# 5. 首次提交
git add .
git commit -m "feat: 初始專案結構"
echo " 首次提交完成"

# 6. 設定遠端
git branch -M main
git remote add origin "git@github.com:$github_user/$project_name.git"
echo " 遠端已設定"

# 7. 提示推送指令
echo ""
echo " 專案已建立!"
echo "請先在 GitHub 建立儲存庫:$project_name"
echo "然後執行:cd $project_name && git push -u origin main"
使用方式:
chmod +x create-project.sh
./create-project.sh my-awesome-app lucashsu95
思路:
- 檢查參數數量
- 建立專案資料夾並進入
- 初始化 Git 儲存庫
- 產生 README 與 .gitignore
- 首次提交
- 設定遠端(但不推送,因為需要先在 GitHub 建立)
進階版:整合 GitHub CLI(gh)自動建立遠端儲存庫!
進階:自動建立 GitHub 儲存庫
# 需要 GitHub CLI(gh)
gh repo create "$project_name" --public --source=. --remote=origin --push
FAQ
Q: 為什麼需要設定 user.name 和 user.email?
每個 commit 都會記錄作者資訊,這些設定用於識別是誰提交的變更。
比喻:就像簽名一樣,證明「這段程式碼是我寫的」!
Q: SSH 金鑰和 HTTPS 的差異?
- HTTPS:每次推送需輸入密碼(或 token)
- SSH:設定一次後無需密碼,更方便安全
建議: 使用 SSH。
Q: 可以在多台電腦使用同一個 SSH 金鑰嗎?
可以,但不建議。每台電腦應產生獨立金鑰,方便管理與撤銷。
比喻:就像每台電腦都有自己的「入場證」,哪台電腦被偷可以單獨撤銷,不影響其他電腦!
Q: 忘記 user.name 或 user.email 怎麼辦?
# 查看目前設定
git config --global user.name
git config --global user.email

# 重新設定
git config --global user.name "新名字"
git config --global user.email "new-email@example.com"
延伸閱讀
- Git Clone - 克隆遠端儲存庫
- 移除 Git 認證 - 清除舊帳號
- GitHub Docs: 連接 GitHub with SSH
- Pro Git 書籍
總結
- 安裝 Git 後需設定使用者名稱與 email(簽名功能)。
- 產生 SSH 金鑰並加到 GitHub,避免重複輸入密碼(一勞永逸)。
- Windows 使用者需檢查認證管理員,移除舊帳號(避免登錯帳號)。
- 測試 SSH 連線(
ssh -T git@github.com)確認設定成功(通關密語)。 - 建立第一個儲存庫,熟悉完整流程(新手村任務完成)。
最後一句話:安裝 Git 就像「遊戲新手教學」,完成這些設定才能正式開始冒險!SSH 金鑰就是你的「VIP 會員卡」,設定一次就能永久免密碼推送,超級方便!現在,出發去寫程式吧!